Professional Headshot at Home: AI Headshots for Studio-Quality Results
You don’t need a high-end studio or an expensive photographer when AI headshots let you create professional-grade portraits right from your home office. With just a smartphone or camera, a plain backdrop, and AI-powered tools, you can capture, upload, and receive polished headshots in minutes—saving time, money, and endless retakes.
By setting up at home, you’ll save hundreds of dollars versus booking a photographer, and AI retouching delivers consistent, studio-quality results in under 20 minutes. Plus, you can stop and restart whenever you need to tweak a pose or check your lighting.
Why Choose A Professional Headshot At Home
Home sessions can cut your expenses by up to 70% compared to a traditional studio booking. Add AI headshots to your workflow and you’ll also bypass complex lighting setups and manual editing—perfect for busy professionals and teams.
Key Benefits Of At-Home AI Headshots:
-
Cost Savings: Rent or buy minimal gear for under $100
-
Flexibility: Shoot on your schedule without studio appointments
-
Creative Control: Swap backgrounds, adjust lights, refine styling
-
AI-Powered Efficiency: Polished headshots delivered in minutes at a fraction of the cost
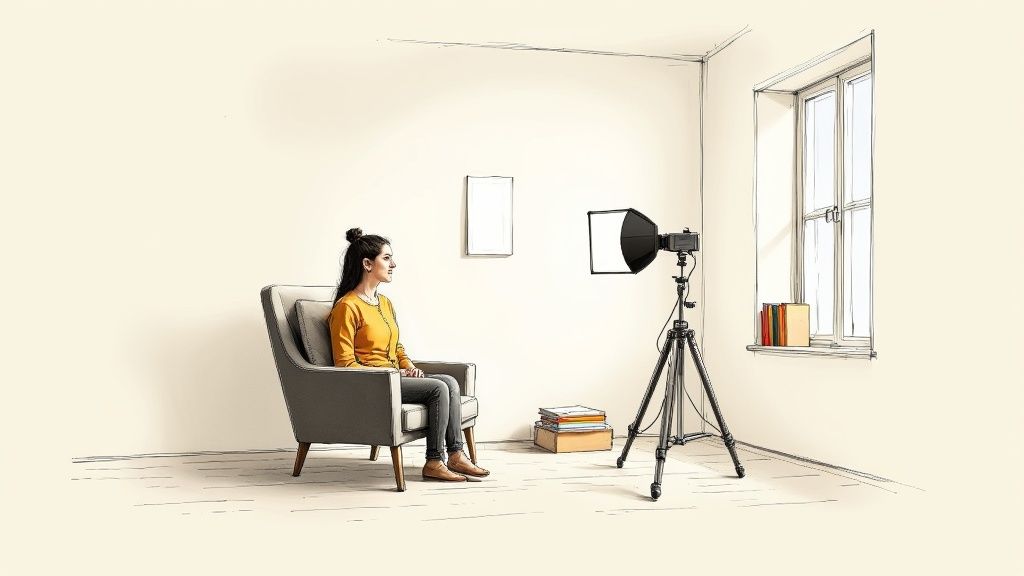
In this setup, a white bedsheet acts as a makeshift diffuser to soften shadows. A stack of books elevates the camera just enough to get that flattering eye-level angle. Then, AI tools take your raw shots and refine every detail—skin tone, background consistency, and framing—so you get a headshot that’s LinkedIn-ready and on-brand.
Home Setup vs Traditional Studio vs AI Headshots
Here’s a quick side-by-side look at how these three headshot methods stack up on cost, turnaround, and creative freedom.
| Method | Average Cost | Turnaround | Creative Control |
|---|---|---|---|
| Home Setup | $30–$100 | Same day | High |
| Traditional Studio | $200–$500 | 3–7 days | Medium |
| AI Headshots | $27–$50 | Minutes | Low to Medium |
Whether you’re updating a LinkedIn portrait or refreshing your company’s professional branding, these options fit any deadline and budget.
If you’re curious about market momentum, the professional headshot photography service sector reached $1.5 billion in 2025 and is on track for a 7% CAGR through 2033. Read the full Archive Market Research report for more insights.
Comfort, cost savings, and speed make at-home AI headshots an attractive choice for individuals and businesses.
Real-World Cost Comparison
-
A typical home session clocks in under $100 for everything from lights to backdrops.
-
AI headshot credits start around $27 per image but deliver polished, brand-consistent results instantly.
-
Traditional studios often charge $283 per retouched photo once you add fees.
Blending a DIY shoot with an AI retouch combines full creative control with the polish of professional editing—ideal for cohesive team portraits or rapid LinkedIn updates.
Set Up Your Space And Perfect Your Look
Finding a quiet corner in your home and treating it like a mini studio makes all the difference. Choose a smooth wall or a neutral-toned backdrop—off-white or light gray—to keep focus on your face. Pull your chair about 3 feet away from that background to banish harsh shadows.
One of my go-to moves? Draping a white bedsheet over a lamp or window to serve as a DIY diffuser, then letting AI headshot software handle the final color correction and sharpening.
Quick DIY Gear Hacks
-
A white foam board reflector to fill in shadows on one side of your face.
-
A sheer shower curtain stretched over clamp lights for soft, even highlights.
-
Two clamp lights with daylight bulbs for under $20 total investment.
Mix and match until you nail the perfect glow—then let AI algorithms refine texture and lighting for a seamless, studio-like finish.
Prepare Your Background
-
Choose a clean backdrop: painted wall, grey sheet, or collapsible stand.
-
Use everyday objects—foam boards, closet doors, bedsheets—to tweak reflection and color.
-
Level everything with stackable books or a low table so the camera sits at eye height.
A tidy frame keeps the focus on you and ensures AI enhancements produce consistent, professional branding across every image.
Position Your Camera At Eye Level
Keeping your lens at eye level captures your natural posture and prevents awkward angles. A sturdy stack of books or an affordable tripod works perfectly here. Leave a sliver of headroom but crop in tight enough to include your shoulders. A slight turn of the torso adds subtle energy without feeling staged.
-
Place your chair 3 feet from the wall.
-
Secure your camera on a tripod or stable pile of books.
-
Relax your shoulders and soften your expression for an authentic portrait.
Grooming And Wardrobe Choices
Stick to solid, mid-tone colors that complement both your skin and backdrop. Skip busy patterns that compete for attention. A crisp shirt or tailored blazer instantly elevates the frame—and AI retouching will keep colors true and skin tone even.
I once coached a freelance designer who chose a teal blouse against a pale grey sheet—their LinkedIn profile views shot up by 60% in just one week.
Viewers respond positively to clean, neutral backgrounds and natural expressions in headshots.
Check out our guide on best headshot backgrounds for fresh ideas to elevate your setup.
Master Lighting With Affordable Gear
Great lighting transforms a simple snapshot into a polished, studio-like headshot you can capture right at home. Aim for the early morning or late afternoon, positioning yourself facing or angled toward a large window. That golden-hour glow is soft, flattering and almost impossible to beat.
-
Use a DIY reflector—foam board, aluminum foil or a white poster board—to bounce light back and fill in shadows.
-
Tame harsh highlights with a sheet of parchment paper or a translucent shower curtain as a diffuser.
-
Match your window’s color temperature by fitting daylight bulbs into ring lights, LED panels or clamp fixtures.
-
Combine natural and artificial sources to sculpt mood, boost clarity and keep your features popping.
Soft natural light and a simple reflector can improve image quality as much as a low-cost studio setup.
The infographic below breaks down how backdrop, camera framing and grooming steps flow together for consistent, professional headshots at home.
DIY Window Light Setup
A window is hands-down the easiest source of high-quality light without spending a dime. Place a foam board reflector just below or beside your face to catch and redirect light. Tiny tweaks—just a few inches of movement—will soften under-eye shadows and preserve those attractive catchlights.
Affordable Artificial Light Options
If you’re shooting regularly, a budget-friendly continuous-light kit gives you ultimate control. LED panels run $40–$60, offering smooth dimming and accurate color. Ring lights start at $25, creating signature circular catchlights. Clamp lights with daylight bulbs cost under $20 yet deliver surprisingly even coverage.
| Light Type | Price Range | Key Benefit |
|---|---|---|
| LED Panel | $40–$60 | Adjustable brightness |
| Ring Light | $25–$35 | Circular catchlights |
| Clamp Light | $15–$20 | Flexible positioning |
Attach a simple diffuser—like parchment paper or a pop-on softbox—to eliminate hotspots. Check out our guide on headshot lighting setup for more expert tips.
Combining window and artificial light lets you dial in the exact look and feel of your brand.
Quick AI Alternative
Pressed for time? AI headshots can mimic a full studio session without any lights or reflectors. With SelfieToPro, four clear selfies become a gallery of polished portraits in about 20 minutes—perfect for LinkedIn portraits and professional branding.
-
Upload four front-facing selfies against a plain backdrop.
-
Pick your preferred lighting style and background from multiple options.
-
Receive around 40 AI-rendered headshots per credit.
AI headshot services can cut setup time by 80% while maintaining professional quality and brand consistency.
Finally, set your camera to a low ISO and a wide aperture (around f/1.8–f/2.8) to minimize noise and achieve that creamy, professional background blur. Even with minimal gear, this balanced lighting approach guarantees a crisp, engaging face—and all without costly studio time.
Capture Your Headshot With Camera Or Phone
Getting a crisp, professional headshot doesn’t demand a studio—just a few smart adjustments. Whether you’ve got a DSLR or the latest smartphone, start by banishing camera shake. Mount your device on a tripod, nestle it between sturdy books, or grab an affordable phone holder—whatever keeps it rock-steady.
-
Smartphone users: enable portrait mode, tap to lock focus on your eyes, then tweak exposure until your skin tone looks natural.
-
Mirrorless and DSLR: choose a wide aperture (f/1.8–f/2.8), set shutter speed between 1/125–1/200 sec, and switch to single-point autofocus.
-
Frame at eye level, leave about 10% headroom, and angle one shoulder toward the camera for a relaxed feel.
These simple settings deliver razor-sharp results without costly gear or studio time. Play with different angles and heights—this is how you discover the look that best reflects your personal brand.
Optimizing Camera Settings
Nailing exposure can feel tricky, but small tweaks make a world of difference. Keep ISO as low as possible to avoid grain in the shadows, then use spot metering or exposure lock to prevent bright areas from blowing out.
-
Tilt your chin down just a touch to soften a strong jawline.
-
Shift your weight onto one leg or lean in slightly for an approachable stance.
-
Fire off timed bursts of 5–7 shots to capture those fleeting, genuine smiles.
Once you’ve wrapped shooting, review your favorites on a larger screen. You’ll spot stray reflections, focus hiccups, or distracting background elements that aren’t obvious on the camera’s preview.
Troubleshooting Blurry Shots
A shaky camera is the top culprit behind blurry headshots. Here’s how to fix it:
-
Use a self-timer or remote shutter release—you’ll reduce blur by 90%.
-
If low light forces a slower shutter, raise ISO or bring in a budget-friendly continuous light (even a sturdy desk lamp helps).
“A solid mount and simple timer cut blur by 90% and save retakes when capturing headshots at home.”
With these quick fixes, you’ll slash session time by 80% and keep gear costs under $100—one reason busy professionals love the DIY plus AI approach. After capturing a batch of crisp images, an AI headshot service can polish your portraits in minutes for consistent professional branding.
Enhance Your Headshot With AI Headshot Generators
Imagine skipping a full studio session and still ending up with a polished portrait. AI headshot tools let you simply upload high-res JPEG or PNG shots against a clean background, pick a look—natural touch-ups, creative lighting, even a wardrobe swap—and let the system do the heavy lifting.
Feeding the AI multiple angles and expressions helps it learn your features. In many cases, your studio-quality headshots arrive in under 15 minutes, ready for team profiles, LinkedIn banners, or website bios.
Traditional professional sessions run about $283 per image, while AI generators start at $27 each. 68% of startups now favor AI headshots for the cost savings and speed, and blind tests reveal AI images are indistinguishable from studio shots 62% of the time. Learn more about headshot cost trends on StudioShot.ai
“I couldn’t believe how fast and affordable my new headshots were—no studio needed.”
-
Affordable Pricing: Save up to 90% versus a traditional photographer
-
Rapid Delivery: Final images in under 15 minutes
-
Studio-Level Quality: 62% of AI outputs pass blind comparison tests
-
Style Flexibility: Swap backgrounds, lighting moods, and outfits
In one real-world example, a consultant friend snapped four selfies in under ten minutes and received finished portraits within twenty—trimming both time and budget. That DIY setup combined with AI refinement brings professional headshots into your home office.
Understanding Upload Requirements
To get the best results, start with at least four clear, front-facing selfies. Shoot against a plain wall or backdrop, using even, diffused light to avoid harsh shadows.
Aim for images no smaller than 1200 × 1200 pixels so the AI preserves all the fine details.
Here’s what the upload interface might look like:
You’ll see easy drag-and-drop controls, style presets, and live preview thumbnails.
Tips For Best AI Results
-
Mix neutral and expressive poses to give the AI more data
-
Use soft, diffused light—natural window light works wonders
-
Crop each shot so your face takes up a similar amount of frame
-
Remove reflective accessories that can cause glare
Cost Comparison Of Headshot Methods
Below is a quick comparison of pricing, turnaround, and retouching effort across common headshot approaches:
| Method | Cost Per Image | Turnaround Time | Post-Production Effort |
|---|---|---|---|
| DIY Home Shoot | $30–$100 | Same day | Moderate manual edit |
| AI Generator | $27–$50 | Minutes | Automated retouch |
| Traditional Studio | $283+ | 3–7 days | Professional editing |
This overview helps you weigh speed, budget, and how much hands-on editing you’ll need. Review each AI-rendered photo for realistic skin texture and balanced proportions. Don’t hesitate to ask for tweaks on lighting, background, or expression.
Check out our guide on https://www.selfietopro.com/blog/best-ai-headshot-generator for style-matching tips and more. This blend of DIY shooting and AI polish makes professional headshots fast, affordable, and high quality.
Final Tips And Common Mistakes To Avoid
A few last pointers can push your at-home headshots from good to great. Keeping things consistent across platforms anchors your personal brand in viewers’ minds. Authenticity shines through—heavy retouching may erase character and natural skin texture, so resist the urge to go overboard.
-
Watch For Red-Eye, which can pull focus away from your confident gaze.
-
Guard Against Unwanted Color Casts That Skew Skin Tones.
-
Steer Clear Of Uneven Shadows That Create Harsh Highlights.
-
Don’t Overcrop—leaving some headroom keeps your composition balanced.
-
Avoid Overfiltering, as it can give an unnatural, plastic feel.
In one real-world scenario, a distributed marketing team snapped ten headshots on their phones, ran them through an AI generator, and wrapped everything in under an hour—spending only $300 instead of the $2,830 they’d pay at a studio.
“We cut costs by 85% and turned around consistent headshots for ten people in just 45 minutes.”
Blending a DIY capture session with AI polishing delivers uniform style, professional polish, and serious savings.
Pre-Upload Checklist
Before you share your final image, run through these quick checks to spot hidden issues:
-
Zoom In To 100% On A Large Screen And Confirm Sharp Detail
-
Verify Framing Leaves Enough Headroom Above Your Hairline
-
Clear Or Blur Background Clutter Using An AI Tool If Needed
-
Match Final Dimensions To Platform Specs (e.g., LinkedIn 400×400 px)
-
Lay Out AI-Generated Variants Side By Side And Pick The Most Authentic
Key Quality Checks
| Method | Cost | Turnaround |
|---|---|---|
| Traditional Studio | $283+ | 3–7 days |
| Home DIY Session | $30–$100 | Same day |
| AI Generator | $27–$50 | Minutes |
AI headshots deliver studio-level results at home in minutes for under $50—an unbeatable combo of quality, speed, and value.
Mixing your own photos with a smart AI workflow gives you total creative control plus expert-level editing. When you catch mistakes early, your DIY shoot can rival expensive studios in consistency and style. Trust your process—tiny imperfections often make headshots feel more genuine and approachable. Now you’re ready to deploy your new portrait across LinkedIn, company websites, and presentations with confidence.
Final Reminders
-
Review Images On Both Desktop And Mobile To Spot Composition Flaws
-
Rename Files And Add Descriptive Alt Text Before Uploading
-
Take Small, Intentional Steps—They Pay Off In Recognition And Credibility
Frequently Asked Questions
Planning a professional headshot at home brings up a handful of common questions. Below, I tackle timing, equipment choices, file specs, and AI acceptance so you can move forward with confidence.
How Long Does A Home Headshot Session Take
A straightforward setup and lighting test usually runs 15–20 minutes, followed by a focused 10–15-minute shoot exploring different poses. Reviewing images and making quick retakes adds under ten minutes, keeping the entire session comfortably below one hour.
Can I Achieve Studio-Grade Results With A Smartphone Camera
Absolutely. Modern phones offer portrait modes, RAW capture, and manual exposure settings. When you mount your device on a tripod and work with soft window light or budget-friendly LEDs—and add AI headshot retouching—you’ll get clarity and depth that rival entry-level DSLRs.
-
Quick Setup cuts prep time under an hour
-
Smartphone Portrait tools mimic professional depth of field
-
AI Touch-Up on SelfieToPro adds polish in minutes
-
Brand Consistency through backdrop, outfit, and lighting choices
Easy and fast.
Platform File Requirements
What File Formats And Sizes Do Sites Need
LinkedIn and most corporate portals accept JPEG or PNG files under 8 MB. Upload at 1200×1200 pixels to guarantee a crisp, professional display on high-res screens.
Are AI-Generated Headshots Accepted By Professionals
Yes—AI portraits grace LinkedIn banners, company bios, and freelancer profiles every day. The key is keeping the result natural, on-brand, and in line with any authenticity guidelines.
“AI headshots deliver studio-grade quality at a fraction of the time and cost.”
Real-World Scenario
One freelance consultant swapped a $300 studio booking for a 30-minute DIY shoot. After snapping a few selfies, they used SelfieToPro AI and received 40 polished headshots in 20 minutes, saving $270 for marketing. They updated their LinkedIn portrait and saw profile views climb by 50% within a week. It’s a perfect example of how an at-home session can seriously boost your professional branding.
Ready to upgrade your profile? Try SelfieToPro for studio-quality headshots at home in minutes.