Pro Headshot Lighting Setup at Home
When it comes to a great headshot, the lighting setup is everything. It's all about controlling where the light comes from and how it hits your face to bring out your best features. It doesn't matter if you're using a simple window or a full studio rig—the goal is always to shape the light to create dimension and kill any distracting shadows. If you can master this one thing, you're most of the way to a professional-quality portrait.
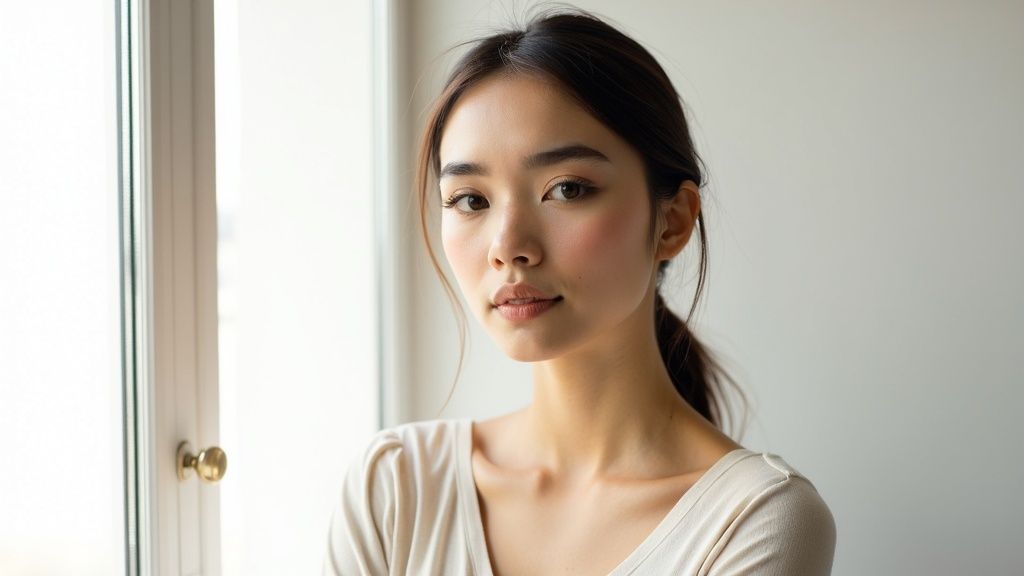
Your Foundation for a Flawless Headshot
Getting a professional headshot doesn't mean you have to book an expensive and time-consuming photoshoot anymore. In today's fast-paced world, you can achieve a polished look right from home. Whether you're setting up your own lights or leveraging the incredible convenience of AI headshots, professional-quality results are more accessible than ever.
The real key to a standout photo isn't about having the fanciest gear; it’s about knowing how to use light. Light is what creates the mood, defines the structure of your face, and ultimately makes your photo look either amateur or truly professional.
The Core Elements of Lighting
At its heart, every headshot lighting setup relies on two main ingredients: a key light and a fill light. The key light is your main, brightest light source. It does the heavy lifting, lighting up your face and creating the main highlights.
The fill light is your secondary, softer light. Its job is to "fill in" the shadows created by the key light, making sure your whole face is nicely lit and details aren't lost in the dark.
But the real secret sauce for pro results comes down to one simple concept: the difference between hard and soft light.
Key Takeaway: For headshots, you almost always want soft light. It wraps gently around your features, is incredibly forgiving on skin, and creates a much more flattering and approachable look. Hard light is the opposite—it creates harsh, distracting shadows that can be really unflattering.
Affordable Alternatives to a Traditional Photoshoot
You don’t need a Hollywood budget to get professional-quality results. The best and cheapest light source you have is probably a large window with indirect sunlight. If you want more control, a simple, affordable LED panel or a ring light can work wonders.
This shift toward accessible quality is bigger than just DIY lighting. Instead of spending hundreds and blocking out your calendar for a single photoshoot, many individuals and businesses are turning to AI-generated headshots. This modern approach offers unparalleled convenience, affordability, and professional quality. You save significant time and money while getting dozens of high-end images perfect for LinkedIn, corporate branding, or your personal website.
Before you start, don't forget about your background. A clean, simple backdrop keeps the focus where it should be: on you. We have a whole guide on choosing the best headshot backgrounds if you need some ideas.
Now, let's compare the most common lighting setups so you can find the perfect one for your needs.
Choosing Your Headshot Lighting Setup
Picking the right lighting doesn't have to be complicated. This table gives you a quick rundown of the most common setups, what they're good for, and how much effort they take to pull off.
| Setup Type | Required Lights | Best For | Difficulty Level |
|---|---|---|---|
| Window Light | 0 (Just a window) | Natural, soft, and approachable portraits. Great for beginners. | Easy |
| Single Light | 1 | Creating classic, dramatic looks with controlled shadows. | Easy |
| Two Lights | 2 | Polished, professional looks with balanced lighting (key + fill). | Intermediate |
| Clamshell | 2 | Flattering beauty shots that minimize wrinkles and blemishes. | Intermediate |
| Three Lights | 3 | Full studio-quality portraits with depth (key + fill + hair light). | Advanced |
Whether you're going for the simplicity of window light or the polish of a three-light setup, understanding these options helps you match the final look to your personal or professional brand.
Using Natural Light for Authentic Headshots
Often, the best lighting setup for a great headshot is the one you already have, and it costs absolutely nothing. I'm talking about a large window. A big, north-facing window provides a gorgeous, soft light that is incredibly flattering for portraits. This is the secret weapon photographers use all the time to create authentic, approachable headshots without a single piece of expensive gear.
This isn’t just a budget-friendly trick; it’s a pro technique. In fact, a recent survey found that 82% of professional photographers use natural light as a primary source in their headshot sessions. Why? Because it creates a warm, genuine look that audiences connect with, which is exactly what’s in demand right now.
The beauty of this setup lies in its simplicity. You don't have to fuss over complex settings or light ratios. Your only job is to use the window as your main "key light," positioning yourself to take full advantage of its soft, beautiful illumination.
Positioning Yourself for Perfect Window Light
First things first, find a large window that isn’t getting blasted with direct, harsh sunlight. An overcast day is your best friend here, but any time the sun isn't streaming straight through will work. Direct sun creates hard, unflattering shadows, and that's exactly what we want to avoid.
Once you’ve found your spot, stand so the window is to one side of you, at roughly a 45-degree angle. This is the classic starting position for a fantastic portrait. Now, turn your body and face slightly toward the window until you see the light softly wrapping around one side of your face, letting the other side fall gently into shadow. This creates depth and dimension—way more interesting than a flat, passport-style photo.
-
Never stand with the window directly behind you. This will turn you into a silhouette, and your camera will have a meltdown trying to expose your face correctly.
-
Don't face the window head-on. While it lights you evenly, it can look flat and wash out all the interesting contours of your face. That 45-degree angle really is the sweet spot.
Pro Tip: Look for the "catchlights." When you're in the right spot, you'll see a small reflection of the window in your eyes. This tiny detail makes your eyes look bright and full of life, instantly adding a professional polish to your shot.
Mastering Shadows with a Simple Reflector
Okay, so one side of your face is beautifully lit, but you might notice the other side is a bit too dark. In a studio, this is where a "fill light" would come in, but you don't need another lamp. All you need is a simple reflector to bounce some of that lovely window light back into the shadows.
And you don't need to buy anything fancy. A piece of white foam board from a craft store, a plain white t-shirt, or even a large sheet of paper will do the job perfectly.
Here’s how to use it:
-
Hold the reflector on the side of your face that's opposite the window.
-
Start with it held low, then slowly raise it and angle it up toward your face.
-
Watch in real-time as the shadows on your cheek and jawline soften and brighten. Just play with the angle until you get a clean, balanced look you love.
This one simple trick will elevate your photo from a good selfie to a professional-looking portrait. It’s a foundational technique used in high-end studios, and you can pull it off for free. For anyone looking to capture a pro image on a budget, mastering this is a total game-changer. If that's you, you might find some great advice in our comprehensive freelancer headshots guide.
Creating Classic Looks with Artificial Light
When that perfect, soft window light just isn't available, you don't have to pack it in for the day. This is where artificial light becomes your best friend, giving you total creative freedom over your headshot. Forget waiting for an overcast sky—now you can craft a specific mood and style whenever, wherever.
A single, affordable light source like an LED panel or an off-camera flash is all you really need to get started.
Even better, this doesn't mean you need to rent a studio or book a traditional, expensive photoshoot. The skills you pick up here are perfect for creating high-quality source photos for AI headshot generators. You get the best of both worlds: pro-level lighting techniques combined with the unmatched speed, affordability, and convenience of AI.
The Power of a Single Light Source
You really don’t need a car full of gear to create a killer headshot lighting setup. A single light is more than enough to sculpt dimensional, classic portraits that make a real impact. The secret isn't how many lights you have, but knowing where to put the one you've got—and more importantly, how to soften it.
There's been a massive shift in professional studios recently. As of 2025, LED panels now make up over 60% of lighting setups for portrait work. It's easy to see why; they're incredibly intuitive because you see the light in real-time. What you see is what you get, making adjustments fast and simple. You can read more about this trend over at CandidStudios.net.
To get that beautiful, flattering quality you'd find from a big, north-facing window, you need a light modifier. A bare bulb or flash is just too harsh, creating sharp, ugly shadows. A modifier takes that small, intense light and spreads it out, making it soft and forgiving.
-
Softbox: This is basically a fabric box that fits over your light with a white diffusion panel on the front. It creates a gorgeous, soft, and directional light that’s a go-to for headshots.
-
Umbrella: These are fantastic, affordable options. A shoot-through umbrella diffuses the light, while a reflective one bounces it back. Both do a great job of softening your light source.
Key Insight: The bigger your light source is relative to your subject, the softer the light will be. Slapping a 48-inch softbox on a tiny flash makes your light source absolutely massive, letting it wrap gently around the face for that polished, professional look.
Setting Up Classic Loop Lighting
Loop lighting is one of the most common and universally flattering patterns for headshots. It’s a subtle touch that adds dimension and works for just about any face shape. The name comes from the little "loop" of shadow created by the nose, which should point down toward the corner of the mouth.
Here’s the simple recipe to get it right:
-
Position Your Light: Place your single light (with its softbox or umbrella) about 30-45 degrees to one side of the camera.
-
Adjust the Height: Raise the light so it's a bit above your subject’s eye level, angled slightly down at them. This angle helps carve out the cheekbones and jawline with natural-looking shadows.
-
Check the Shadow: Now, look for that small nose shadow. If it's too long and touches the lip, your light is too high. If there’s no shadow at all, the light is probably too close to the camera. It just takes a few small tweaks to dial it in.
This setup is the perfect starting point. It’s incredibly simple but delivers consistently professional results every time.
Achieving Dramatic Rembrandt Lighting
If you're after a moodier, more artistic vibe, you can't go wrong with Rembrandt lighting. Named after the legendary painter who used this style in his portraits, it’s defined by a small, inverted triangle of light on the cheek opposite your main light.
Getting this look just requires a slight shift from the loop lighting setup.
-
Increase the Angle: Move your light further to the side, pushing it closer to a 45-60 degree angle from the camera.
-
Raise It Higher: The light source needs to be higher than it was for loop lighting. This helps cast that more pronounced shadow from the nose, which connects with the shadow on the cheek.
-
Look for the Triangle: The whole game here is seeing that isolated triangle of light on the less-lit cheek. If the shadow swallows the whole cheek, move the light a bit closer to the camera. If you don't see a triangle at all, push the light further to the side.
Rembrandt lighting adds a real sense of sophistication and drama. While it feels more "artistic," it can be an amazing choice for authors, artists, or anyone who wants a headshot with a little more character. This is the kind of control that makes working with artificial light so powerful.
Getting That Modern, Bright Headshot Look
If you're after that crisp, clean, and modern look you see in high-end corporate and beauty headshots, a two-light setup is the secret weapon. It’s how you get that beautiful, even illumination that just feels bright and professional. The best part? You don’t need an expensive studio booking to nail this polished result.
These techniques are perfect for creating photos that not only look fantastic on their own but also serve as the ideal source images for AI headshot generators. When you give the AI a well-lit, shadowless base photo, you're setting it up for a flawless final output. This simple step can save you the time and expense of hiring a traditional photographer.
Let’s walk through two of the most effective methods I use: the clamshell setup and the ring light.
The Ultra-Flattering Clamshell Setup
The clamshell is a long-time favorite among beauty and fashion photographers for one simple reason: it’s incredibly flattering. By placing two lights in a "clamshell" formation around your face—one above and one below—you essentially wipe out harsh shadows, soften skin texture, and create a radiant glow.
This setup sculpts the face with soft light instead of hard shadows, which is exactly why it works so well for that clean, professional aesthetic.
-
Top Light (Key Light): Your main light, ideally with a large softbox or umbrella, goes directly in front of you. Angle it down at about a 45-degree angle, raised just above your head.
-
Bottom Light (Fill Light): Place a second, less powerful light (or even a simple white reflector) directly below the first one, angled up toward your chin. This second source "fills" in any shadows cast by your nose or chin, creating that signature smooth look.
The real trick is balancing the power. Your top light needs to be the dominant one. If you're using a second light for fill, a good starting point is setting it to about half the power of your key light. If you're using a reflector, just play with its distance and angle to control how much light bounces back up.
Pro Tip: For an extra sparkle in the eyes, make sure your top light is positioned to create a nice catchlight. That tiny reflection brings a portrait to life, making it feel instantly more engaging.
Mastering the Versatile Ring Light
The ring light has absolutely exploded in popularity, moving from a niche tool for macro photographers to a staple for pretty much everyone. Its unique design—where the camera lens sits in the center of the light source—produces incredibly even, shadowless illumination from a single piece of gear.
This all-in-one approach is what creates that distinctive bright look and the signature circular catchlights in the eyes.
The use of ring lights for headshots has seen a huge surge, especially among independent professionals. In 2025, over 40% of professional headshot photographers reported using ring lights in their standard setup. Their popularity is really driven by affordability and portability, which has made pro-quality lighting accessible to way more people. You can find more insights on 2025 headshot trends on accio.com.
While it's often associated with an "influencer" style, a ring light can produce a highly polished corporate look when you use it right.
-
Positioning is Key: Place the ring light directly in front of you, with your camera or phone peeking through the center. You’ll want to adjust the height so the middle of the light is at eye level.
-
Control the Power: Most ring lights have adjustable brightness. Always start at a lower setting and slowly increase it until your face is evenly lit without looking washed out.
-
Avoiding Glare on Glasses: If you wear glasses, glare can be a real pain. To fix it, try raising the ring light slightly higher than eye level and angling it downward. This little adjustment changes the angle of reflection, often moving the glare completely out of the camera's view.
A ring light is the ultimate tool for convenience and quality. It’s an affordable and effective way to get a modern, professional look at home with minimal fuss.
Achieving Studio-Quality Dimension
If you're after that polished, professional look—the kind that screams "high-end studio"—then the three-point lighting setup is your secret weapon. It’s a classic technique borrowed from cinema and photography that adds incredible depth and makes your subject pop right off the background.
It might sound technical, but think of it as a simple recipe with three lights, each with its own job. Once you understand how they work together, you can create portraits with a rich, dynamic feel.
The best part? You don't need to book an expensive photoshoot. Mastering these principles helps you create amazing source photos, which are perfect for feeding into an AI headshot generator like SelfieToPro. Great input photos guarantee you'll get the most realistic and polished AI results, saving you hundreds of dollars and a ton of time.
Breaking Down the Three-Point Lighting Setup
This setup uses three distinct light sources to sculpt the face and create separation from the background. Each one plays a critical role.
-
The Key Light: This is your main light, the brightest of the bunch. Just like in a one-light setup, it sets the overall mood and creates the main highlights and shadows.
-
The Fill Light: Placed on the opposite side, this secondary light is softer and less intense. Its only job is to gently fill in the darkest shadows cast by the key light, so you don't lose important details.
-
The Rim Light: This is what creates that professional "pop." Placed behind your subject, it traces their outline with a subtle highlight, pulling them away from the background and preventing the shot from looking flat.
Positioning Your Lights for Maximum Impact
Getting the placement right is everything. Let's begin with your primary light source.
Position your key light about 45 degrees to one side of the camera and just above your subject's eye level, angling it down. This creates classic, flattering patterns like loop or Rembrandt lighting that give the face beautiful shape and definition.
Next up is the fill light. Set it up on the opposite side of the camera, also around a 45-degree angle. Remember, its job is to soften shadows, not eliminate them. A solid rule of thumb is to set your fill light to about half the power of your key light. This creates a pleasing 2:1 lighting ratio that keeps the dimension without any harsh, dramatic shadows.
Pro Tip: Don't have a third light? No problem. You can still get that professional separation. Just place a simple white reflector behind you. It will bounce light from your key and fill lights back onto your hair and shoulders, creating a fantastic makeshift rim light.
Adding the Finishing Touch with a Rim Light
The rim light—also known as a hair light or kicker—is what elevates a headshot from good to great. This light goes behind your subject, pointed back toward them from either directly opposite the camera or slightly off to the side.
Pay close attention to its height and angle. You want it high enough to stay out of the camera's view and angled so it doesn't shine directly into your lens, which would cause nasty flare. The goal is a clean, crisp outline along the hair and shoulders.
When it comes to power, less is more. The rim light should be just bright enough to create separation, not a distracting halo. I often find that setting it to a power level similar to or even slightly less than the fill light is the sweet spot. This final touch is the key to that three-dimensional, studio-quality look that makes a headshot truly stand out.
Perfecting Your Photos for AI Headshots
AI headshot generators are a game-changer, delivering professional-quality portraits with incredible convenience and affordability compared to a traditional photoshoot. But there's a catch: their results are only as good as the selfies you feed them. The cleaner and more consistent your source photos are, the more stunning and realistic your final headshots will be.
Think of it this way: the AI is learning your face from the images you provide. If you give it photos with chaotic backgrounds, wildly different angles, and harsh, unflattering shadows, it gets confused. This confusion leads to weird artifacts and less-than-perfect results. The good news? You don't need a complicated headshot lighting setup to nail this; you just need consistency.
Optimizing Your Selfies for the Best AI Results
Your goal here is simple: give the AI clear, reliable data to work with. This means creating a set of photos where your facial features are consistently visible and well-lit from the front.
-
Flat, Even Lighting is Your Best Friend: Stand and face a large window during the day. This soft, natural light is perfect. A ring light works great, too. The key is to minimize shadows on your face, which can distort your features and throw off the AI.
-
Find a Neutral Background: A plain wall in a solid, neutral color (like white, grey, or beige) is ideal. Busy backgrounds with patterns, furniture, or other objects can interfere with the generation process and bleed into your final headshots.
-
Keep Your Angle Consistent: Try to keep your head position and your distance from the camera pretty similar across all your photos. This helps the AI build a much more accurate 3D model of your face.
Following these simple guidelines is the secret to unlocking the full potential of any AI headshot generator. It's what ensures you get high-quality, professional portraits that look like they came from an expensive studio session.
For a deeper dive, check out our complete guide on how to take the perfect photos for AI headshots.
One last pro tip: always use your phone's main rear camera, not the selfie camera—it has a much higher resolution. And make sure to turn off portrait mode; the artificial background blur can seriously interfere with the AI.
Got Headshot Lighting Questions? We’ve Got Answers.
Even with the best plan, you're bound to run into a few questions once you start setting up your lights. Here are some of the most common ones I hear, with quick answers to get you back on track.
What’s the Most Flattering Lighting for a Headshot?
If you're looking for one go-to setup that works for almost everyone, loop lighting is your best bet. It’s the industry standard for a reason—it’s safe, flattering, and adds just the right amount of dimension.
You create it by placing your main light slightly above your subject’s eye level and about 30-45 degrees off to the side of the camera. This angle casts a small, soft shadow from the nose that defines the face without being overly dramatic. For a brighter, more contemporary vibe, a Clamshell or Ring Light setup is also incredibly flattering, as it’s designed to fill in shadows and create a soft, even glow.
Can I Actually Get a Professional Headshot with My Phone?
Absolutely. The cameras in modern smartphones are ridiculously good. The key isn't the phone itself, but how you control the light.
For the best results, use the main rear camera (it's always higher quality than the selfie cam) and find a large window with soft, indirect sunlight. Facing that window will wrap you in beautiful, flattering light that professional photographers try to replicate in the studio.
Pro Tip: Grab a piece of white foam board from any craft store and hold it on the opposite side of your face from the window. This simple trick bounces light back into the shadows, acting as a fill light and giving your photo a much more balanced, professional look. Don’t forget to use Portrait Mode to blur the background!
What’s the Real Difference Between Hard and Soft Light?
It all comes down to the size of your light source relative to your subject. Think of it this way:
-
Hard light comes from a small, direct source, like the sun on a clear day or a bare flash bulb. It creates sharp, defined shadows with hard edges.
-
Soft light comes from a large, diffused source, like a window on an overcast day or a flash fired through a big softbox. It produces gentle, gradual shadows.
For headshots, soft light is almost always the right choice. It’s far more forgiving on skin, minimizes blemishes, and creates a much more pleasing and professional aesthetic.
Tired of fussing with lights and cameras? You can skip the entire headshot lighting setup. With SelfieToPro, you turn simple selfies into studio-quality headshots in just a few minutes. Upload your photos, and our AI does the heavy lifting, delivering professional results at a fraction of the cost and effort. Get your perfect headshot today.